Assisted mode means that there is a volunteer operating the kiosk to check the participants into activities. This is the mode that you will most often use at registration areas for first time visitors or for special activities that may require assistance to locate rooms or to complete registration.
At a high level, the steps you take to check people into activities using assisted mode are:
Tip! New visitors should be directed to complete a visitor registration card. You will need to collect dates of birth for children checking into activities as well as special needs information such as allergies.
Let’s break each of these steps down. Step 1 is pretty obvious, but remember it’s easy to get distracted by technology and forget that one of the main reasons people come to church is to connect with the community. So smile, greet, and make people feel welcome before you do anything else.
Step 2—ask for what? Why the last 4 digits? The short answer is that it’s easier to hear numbers than name pronunciations in crowded hallways. Also, searching by phone numbers is a focused search guaranteed to bring back fewer search results than typing in common last names such as “Smith”. That being said, if the person cannot remember his phone number, you can always use a last name, first name or even a partial name search.
Note: All pictures in this section display Check‐in with its default color theme. Your church has the ability to configure custom themes and these themes can be applied to each activity separately. Your screen may have completely different colors than those shown below.
Don’t’ be alarmed! All screens will still have the same buttons, they may just be in different colors.
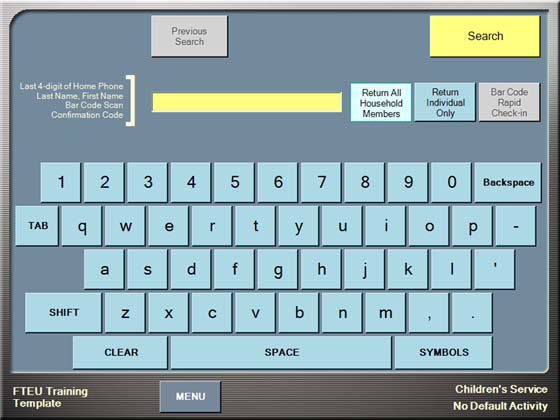
Step 3—finding the person. You will be presented with the search screen as shown below after you complete every check‐in.
You will probably have questions as you read through this quick start section. There are many settings and buttons available to you when using Check‐in. Don’t worry about these now, they will be covered in later sections of this guide.
Simply use the touch pad to enter the numbers and then touch Search. You will see a list of matching search results as shown below.
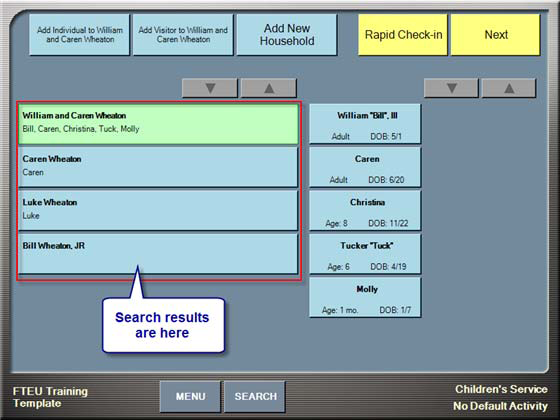
The first household in the listing is selected by default, but you can always change this by touching the household that contains the participants you want to check in. If you searched for a common name like “Smith”, you may have more results than you can see on one page. If this is the case, the paging arrows at the top of the list will activate.

Touch the downward facing arrow to view the next set of households.
The next thing to do is to select all individuals in the household wishing to check in. Do this by touching the box with the person’s name in it. Notice that selected items change color. If you accidentally touch the wrong name, simply touch it again to de‐select it.
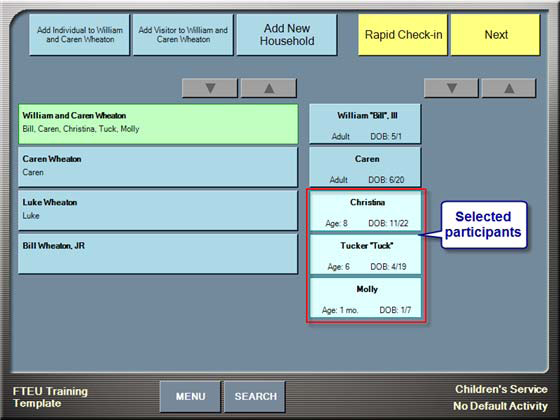
Tip! Repeat the names back to the family while you are touching them to confirm the individuals checking in. For example, “Are you checking in Christina, Tuck, and Molly today?”
Step 4—you are now ready to check the selected individuals into the correct locations. Do this by touching the Next button (upper‐right corner of the screen). The first selected individual appears with the correct assignment/best age fit room selected by default.
As shown in the image below, Christina will be checked into the 11:00 AM schedule into the John room. You know this because there is a check mark in the 11:00 AM schedule box and the buttons to the John room are all selected.
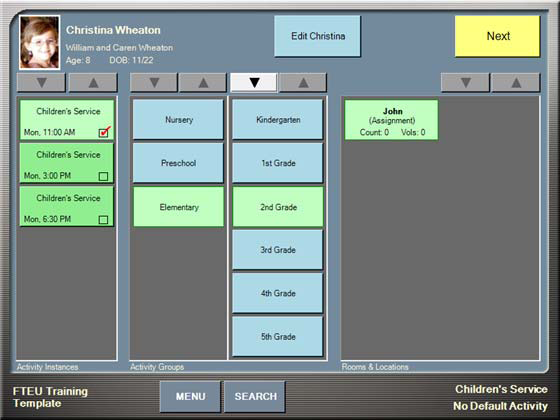
If you need to make changes, simply select the correct location by touching the appropriate buttons.
Adding additional schedules is common for people who attend multiple activities such as both a Bible study and the worship service or for volunteers who serve during one schedule and then attend during another schedule. If this is the case, simply touch an additional schedule in the left most column and make sure the correct location is selected in the right column.
Tip! If you are working an early check‐in schedule for an activity with multiple schedules (such as worship or children’s services) ask families how many services they will be attending. For example, if you are working the 9:00 AM schedule and there are also 10:15 and 11:30 AM schedules available, ask participants if they would also like to check into a later schedule as well.
Touch Next and complete this procedure for every participant in the household. The last time you touch Next a review screen appears as shown below:
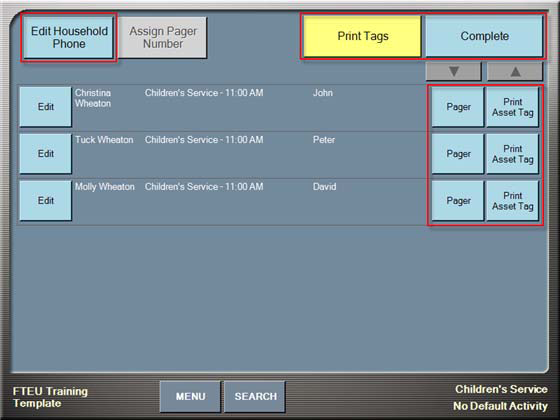
Note: Double‐check your entries on this screen. Touch the Edit button beside any participant who has an incorrect assignment to make changes.
From this screen, you can do any of the following:
When you are happy with your choices touch Print Tags and then Complete to return to the search screen.